Introduction
GA4GH Phenoboard is a tauri app designed to help curate cohorts of individuals with rare genetic disease using the GA4GH Phenopacket Schema.
Download
Installers for Mac, Windows, and Linux are available from the Releases page of the GitHub repository.
Background
Phenoboard is designed to curate cohorts of individuals with heritable diseases for the HPO project.
The Application
Phenoboard is a tauri application that can be installed on Mac, Windows, and Debian linux systems. Most users will want to download prebuilt installers from the Releases page of the projects GitHub repository.
Users can curate individuals with a certain disease, represented using an OMIM identifier. One or many individuals can be curated. The help section provides tutorials for the major functionalities of the app.
Background
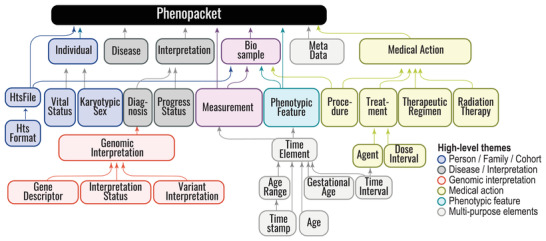
GA4GH Phenopackets
The Global Alliance for Genomics and Health (GA4GH) is developing a suite of coordinated standards for genomics for healthcare. The Phenopacket is a GA4GH standard for sharing disease and phenotype information that characterizes an individual person, linking that individual to detailed phenotypic descriptions, genetic information, diagnoses, and treatments.
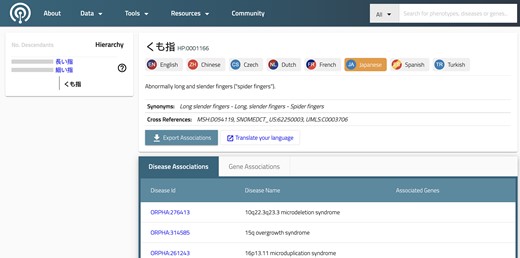
Human Phenotype Ontology (HPO)
Ontologies are systematic representations of knowledge that can be used to capture medical phenotype data by providing concepts (terms) from a knowledge domain and additionally specifying formal semantic relations between the concepts. Ontologies enable precise patient classification by supporting the integration and analysis of large amounts of heterogeneous data. The HPO is widely used in human genetics and other fields that care for individuals with rare diseases (RDs) and is also increasingly being used in other settings, such as electronic health records (EHRs). HPO terms are used in the Phenopacket Schema to represent phenotypic features such as signs, symptoms, and laboratory and imaging findings.
Additionally, the HPO project is developing a corpus of phenopackets derived from the published literature that with time will form the backbone of the HPO annotation project (A corpus of GA4GH phenopackets: Case-level phenotyping for genomic diagnostics and discovery).
Applications
Phenoboard is designed to help rapidly and accurately curate case and cohort reports about Mendelian disease from the medical literature. A growing number of software packages is available for analyzing cohorts of phenopackets, some of which we describe here.
- Genotype Phenotype Correlation Analysis
- Validation of bioinformatics software
- Clustering. Software is in development to cluster (stratify) cohorts of phenopackets
- Feature-Feature correlation analysis
- Oncopacket: Integration of cancer research data using GA4GH phenopackets
- Phenopacket-tools: Java library and application for building and validating GA4GH phenopackets
- Converting OMOP CDM to phenopackets: A pipeline to transform data from OMOP to Phenopackets
- phenopacket2prompt: A Java tool to create LLM prompts from phenopackets (can be used to test performance of LLMs at genomic differential diagnostic support.)
- RareLink: A scalable REDCap-based framework for rare disease data interoperability (integrates phenopackets, FHIR, and RedCap)
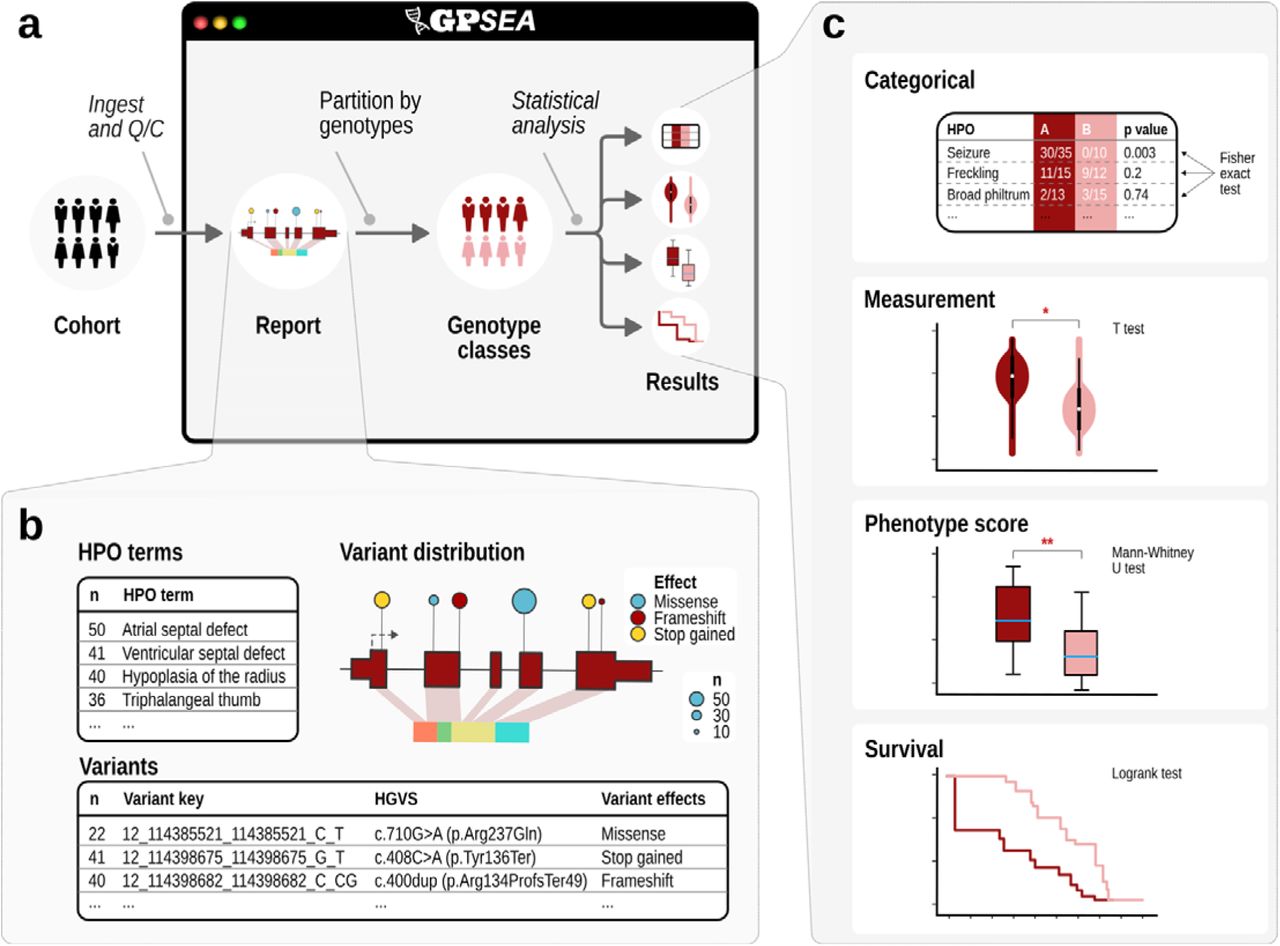
GPSEA (Genotype-Phenotype Statistical Evaluation of Associations)
There are a huge number of clinical manifestations of human disease, and even individuals with the same clinical diagnosis may present with different combinations of phenotypic abnormalities, ages of onset of these abnormalities, and degrees of clinical severity. A key question for genomic precision medicine is how specific genetic variants influence clinical phenotype. The correlation between genotype (the type of variant or variants present at a given location) and phenotype (presence or absence of medically relevant observable traits) is defined as an above-chance probability of an association between the two, an association termed genotype-phenotype correlation (GPC). GPSEA leverages case-level phenopackets, characterizing an individual person or biosample and linking the individual to detailed phenotypic descriptions, genetic information, diagnoses, and treatments. GPSEA automates the process of visualizing and performing GPC analysis (GA4GH Phenopacket-Driven Characterization of Genotype-Phenotype Correlations in Mendelian Disorders).
Validation of bioinformatics software
Exomiser and many other software packages for genomic diagnostics user Phenopackets as input files. Developers of such software can use phenopackets from Phenopacket Store to test new algorithms. PheVal is designed to take phenopackets as input to test software for diagnostic genomics.
For special use cases, Phenoboard can be used to rapidly create specific phenopackets needed for testing or validation of software.
Phenoboard Help
Phenoboard offers several ways of curating clinical data.
Workflow
In general, phenoboard supports curation of cohorts (which can consist of one or multiple individuals with a specified disease). Users create a new cohort file or open an existing one. following this, Phenoboard provides tools to support curation of individual cases or or external Excel files that contain information about a cohort. Each step is quality-controlled, and text-mining, autocompletion, and rretrieval of information about variants using VariantValidator is provided. After finishing curation, the user can store or update the cohort file, export a collection og phenopackets representing all of the individuals in the cohort file or export an aggregate tab-separate file representing a summary of phenotypic features of the cohort (HPOA format).
Installation
Phenoboard is available as prepackaged installers for macOS, Windows, and Linux. Download the latest version from the Releases page.
Installing on macOS
File to download:
phenoboard_<version>_aarch64.dmg
This is the macOS installer for Apple Silicon (M1/M2/M3/M4 Macs)
Because this application is open-source and distributed for free, it is not signed or notarized by Apple. macOS will warn you the first time you try to open it. Here's how to install:
- Download the
.dmgfile from the Releases page - Open the DMG and drag the app into your Applications folder
- When you try to open it, macOS will show the message:
"'phenoboard' is an app downloaded from the Internet. Are you sure you want to open it?"
If you confirm, the app will be installed into your `Àpplications``folder and started. From now one you can open phenoboard like any other application (e.g., using the Spotlight searchbar).
Installing on Windows
File to download:
phenoboard_<version>_x64_en-US.msi
Windows installer (MSI format)
- Download the
.msiinstaller from the Releases page - Double-click to start the installer
- If Windows shows a blue SmartScreen dialog saying:
"Windows protected your PC" - Click "More info" → "Run anyway"
Note: Windows shows this for unsigned apps from new developers. Once you install and run it, the warning will not reappear.
Installing on Linux
Debian/Ubuntu (recommended)
File to download:
phenoboard_<version>_amd64.deb
Debian/Ubuntu package
- Download the
.debpackage from the Releases page - Install using:
sudo apt install ./phenoboard_<version>_amd64.deb
Or using dpkg:
sudo dpkg -i phenoboard_<version>_amd64.deb
Other Linux Distributions
File to download:
phenoboard_<version>_amd64.AppImage
Universal Linux application (no installation needed)
- Download the
.AppImagefile from the Releases page - Make it executable:
chmod +x phenoboard_<version>_amd64.AppImage
- Run it:
./phenoboard_<version>_amd64.AppImage
Note for Arch-based distributions (e.g. EndeavourOS, Manjaro, etc.): The AppImage may not build/run correctly due to linuxdeploy compatibility issues. Use the .deb package instead (installable via debtap), or build from source and run the binary directly at ./src-tauri/target/release/phenoboard.
Troubleshooting on Linux
Crash on launch: Failed to create GBM buffer (hybrid GPU / Wayland)
It seems that the Tauri/wry rendering stack on Linux goes through WebKit2GTK, which by default attempts GPU-accelerated compositing via EGL and GBM. On hybrid GPU systems with NVIDIA drivers under Wayland, GBM buffer allocation can fail because the NVIDIA proprietary driver's GBM support is incomplete or incompatible with how WebKit2GTK requests buffers. The workaround is to disable WebKit2GTK GPU compositing:
WEBKIT_DISABLE_COMPOSITING_MODE=1 ./src-tauri/target/release/phenoboard
Crash during cohort verification (no error message)
A crash with no error message has been observed when verifying cohort data prior to Phenopacket export, after tabular data has been pasted successfully. The root cause is under investigation. If you encounter this, please report your steps in the issue tracker.
Building from Source
This will work on any OS.
git clone https://github.com/your-username/your-repo.git
cd your-repo
npm install
npm run tauri build
The built installers will appear under:
src-tauri/target/release/bundle/
Prerequisites
Node.js (at least version 18) and npm (at least version 9).
You can check if you have them installed via
node -v
npm -v
If necessary, go to https://nodejs.org to install these programs.
Rust and Cargo
See https://rustup.rs if needed.
Git
If you do not have git installed, replace the cloning step with a download of the archive.
Platform-specific code
Please report any dependencies not listed above.
Running the app
- Clone from GitHub
git clone https://github.com/P2GX/phenoboard.git
cd phenoboard
- Install npm dependencies From within the phenoboard directory, enter
npm install
- Running the app
npm run tauri dev
This will run the application.
Start page
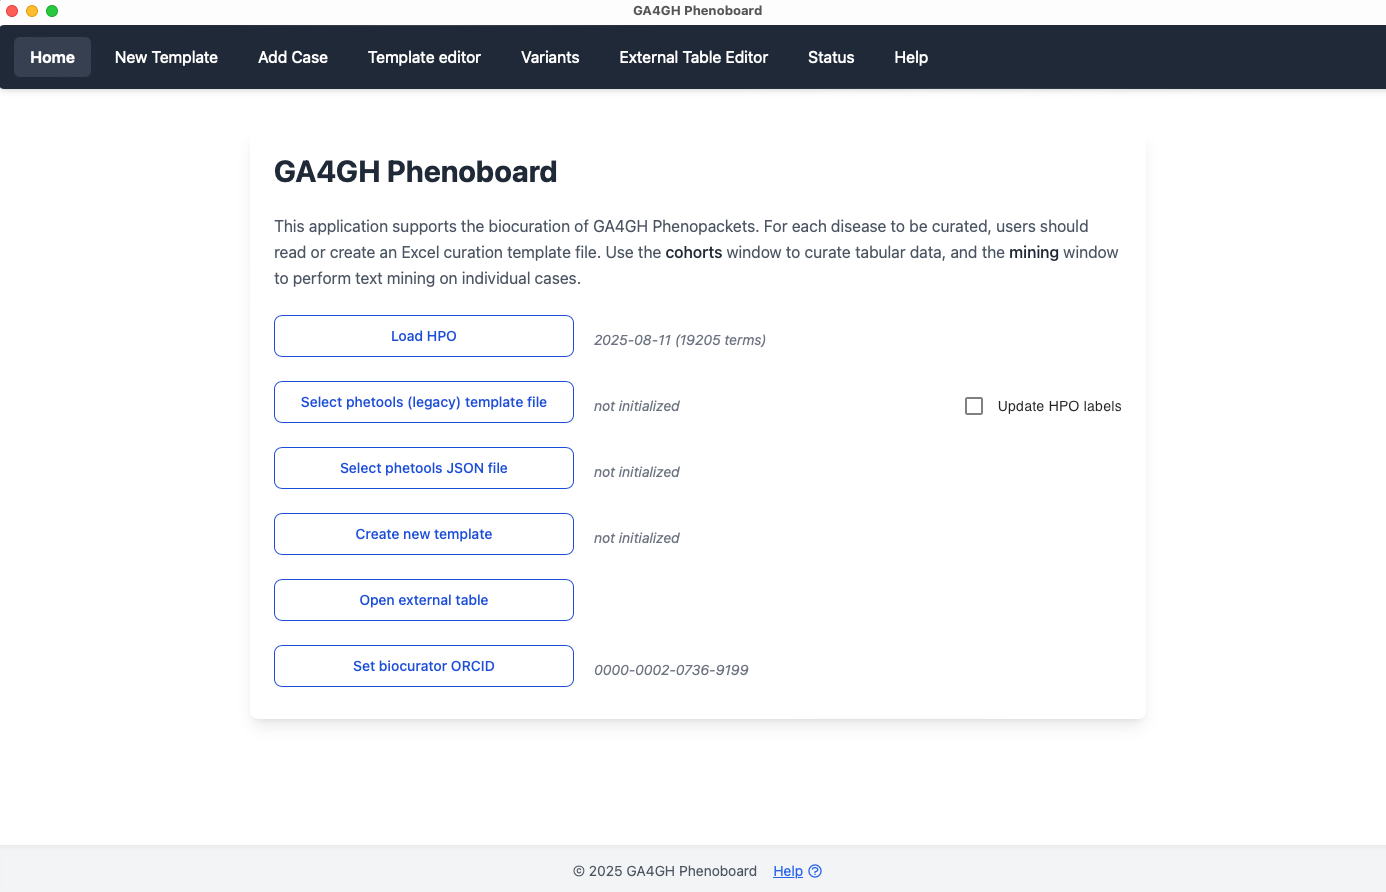
ORCID
Before using Phenoboard for the first time, the user needs to enter an ORCID research indentifier. Enter just the number (e.g., enter 0000-0002-0736-9199 and not https://orcid.org/0000-0002-0736-9199). Phenoboard stores the ORCID in its settings directory (which is automatically created as a hidden directory in the user's home directory upon the first use of the app). From this point on, the ORCID will be automatically loaded upon program start.
Load the HPO
Before curation, the user needs to load the hp.json file. We recommend always using the latest version, which can be found in the Download section of the HPO website. The path to this file is always stored in the settings directory, and the ontology will be loaded automatically upon program start. Users should check if an update is available and if so, download the new hp.json file and load it in Phenoboard.
Create a pheboard cohort file
This option creates a new pheboard cohort (JSON) file.
Select pheboard cohort file
This option selects a Pheboard JSON file that is used to store data about a cohort and which Pheboard uses to create a collection of phenopackets representing the cohort. TOO
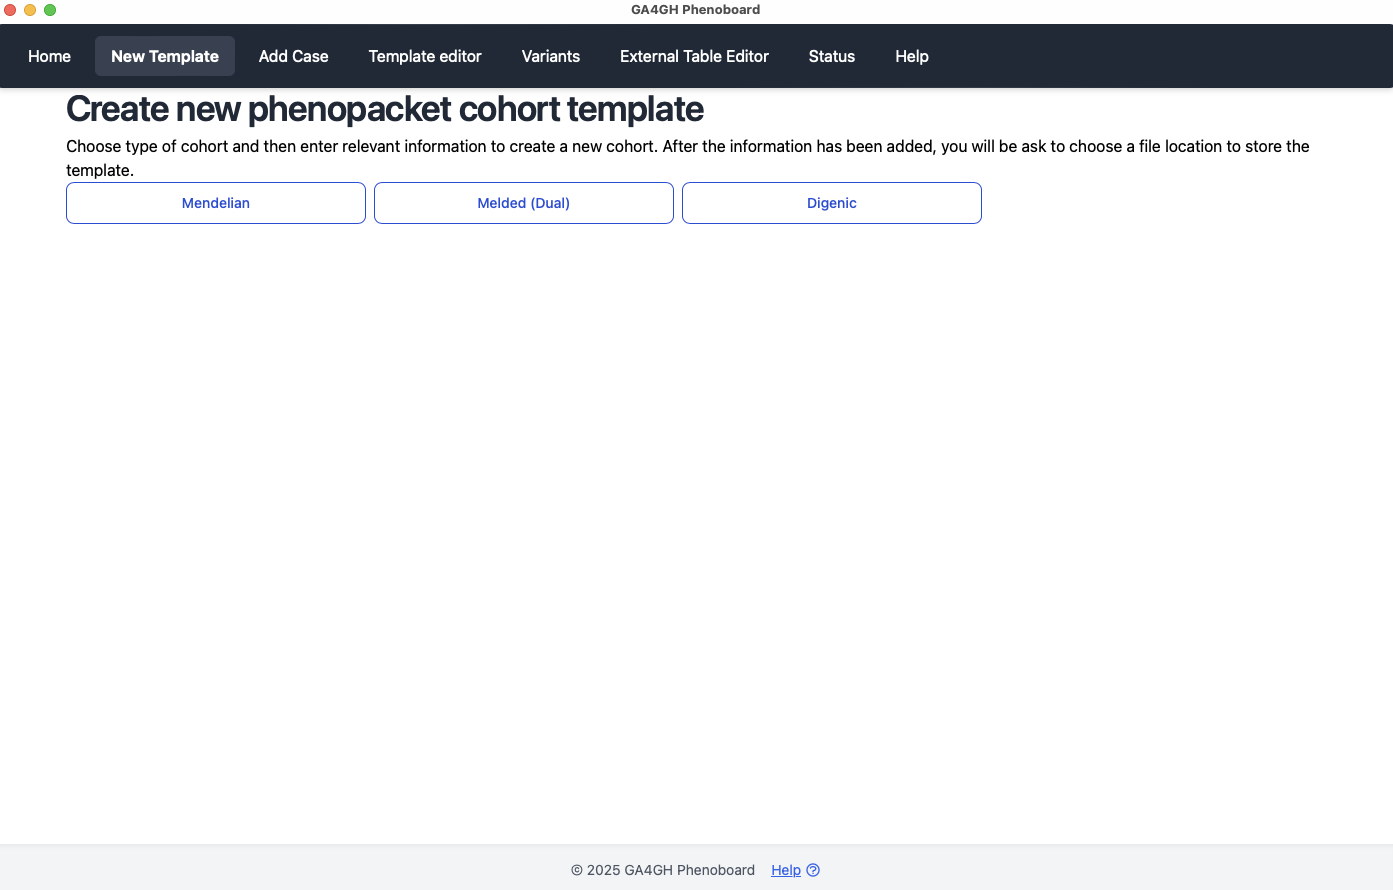
New cohort
Phenoboard creates cohort files (JSON files) that represent one or more individuals diagnosed with a disease. There are three support disease categories:
- Mendelian
- Melded phenotypes
- Digenic disease
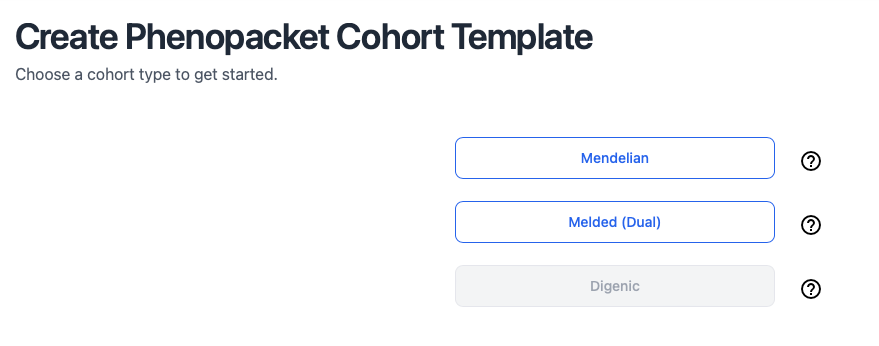
Choose cohort type
Once we have created a new cohort, we can curate either a phenopacket (one individual, e.g., from a published case report) or a cohort (group or individuals, e.g., from a published cohort report with a table of clinical findings with one row or column per individual).
Case reports
Phenoboard allows individual case reports to be curated using text mining. This functionality is useful for publications with narrative descriptions of a case. In this example, we will curate an individual with Loeys-Dietz syndrome type 1 from PMID: 35003478. First, make sure that information about a cohort has been loaded by either using the new cohort page or by loading an existing cohort JSON file. Then go to the Add Case page.
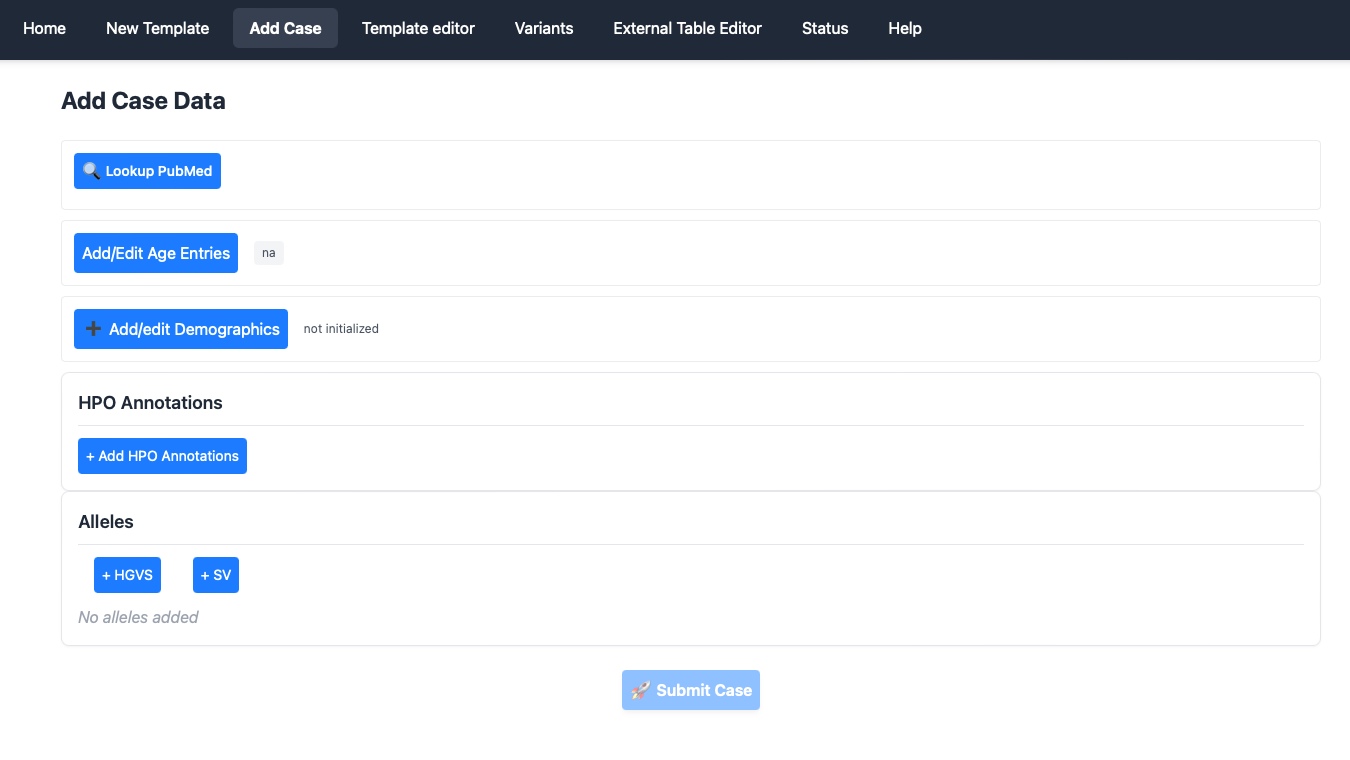
Lookup PubMed
Phenoboard is currently setup to curate published literature with a PubMed identifier (contact us if you would like to use the app for in house cohorts). The user will first need to enter a PMID, either as PMID: 35003478or with just the number (35003478). The app will reach out to PubMed and retrieve the title, which is also stored.
The app will warn users if it is attempted to enter a previously used PMID (perhaps because the same article is being mistakenly entered a second time). If you are entering multiple individuals from the same article, the warning can be ignored.
Add and Edit Age entries
Enter the age entries needed to curate the case. See GA4GH Phenopackets: A Practical Introduction and the Phenopacket Schema documentation for information about how to represent ages. In brief, one case use one of three options:
- HPO Onset terms, e.g., "Congenital onset"
- ISO 8601 Periods, e.g., P3Y4M2D for 3 years, 4 months, and 2 days
- Gestational age, which we represent, for instance, as G32w4d for 32 weeks and 4 days.
Add/Edit Demographics
Enter the identifier of the patient as used within the publication (it must be unique within the publication is multiple individuals are curated), as well as the age of onset, age when the individual was last medically examined, the sex, deceased status, and if desired an optional comment. Only the individual identifier is required (in our example, the onset and the last encounter age are both 14 years, P14Y, and the affected individual is a boy who is not deceased; we entered the individual ID as Case reportbecause that is the title used for the clinical description. It would also be acceptable to use 14 year old malebecause the individual is described in this way by the authors).
Add HPO annotations
This widget performs text mining on text that is pasted into the window.
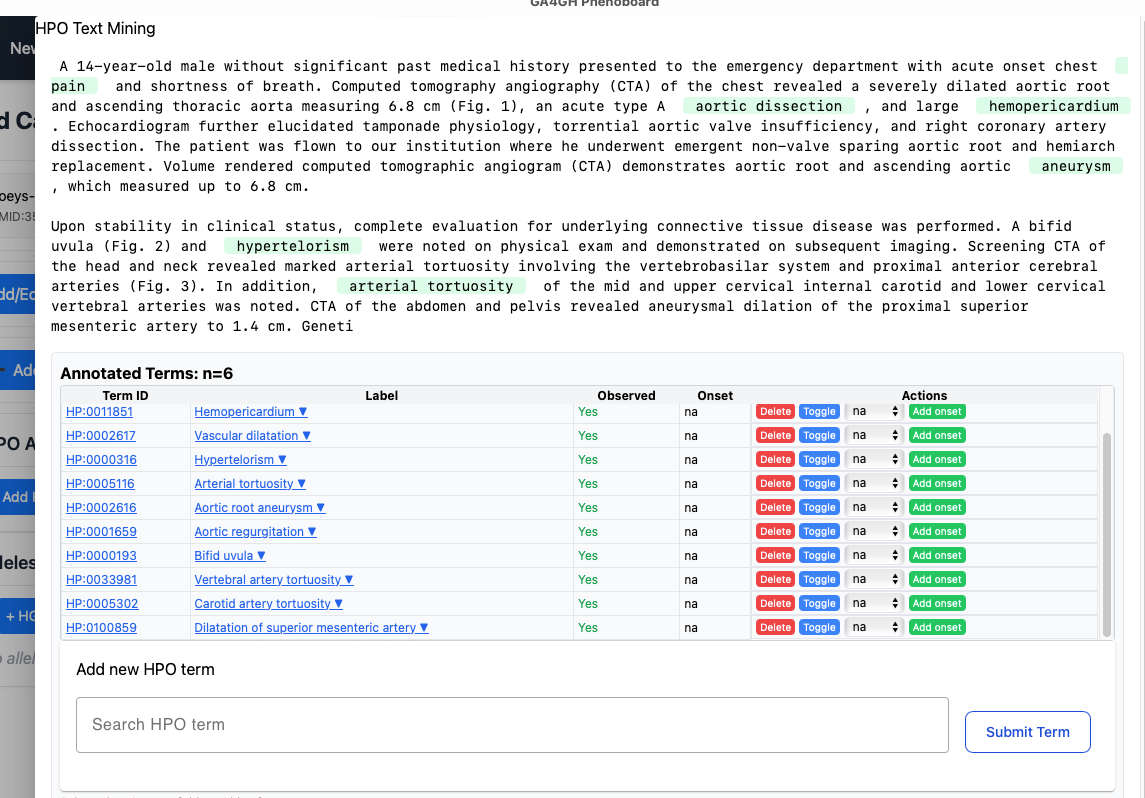
When you are finished adjusting the text mining results, click "Finish".
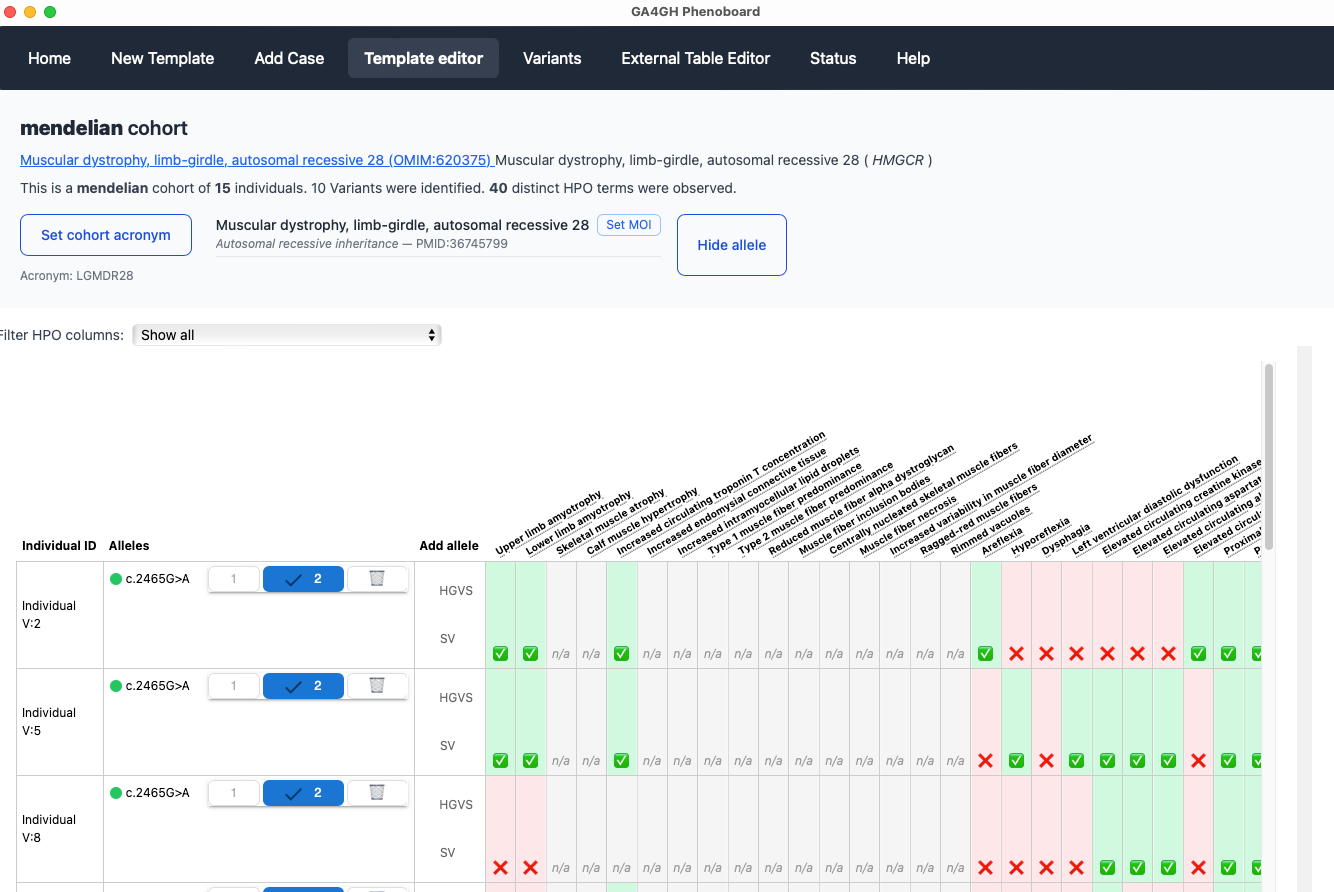
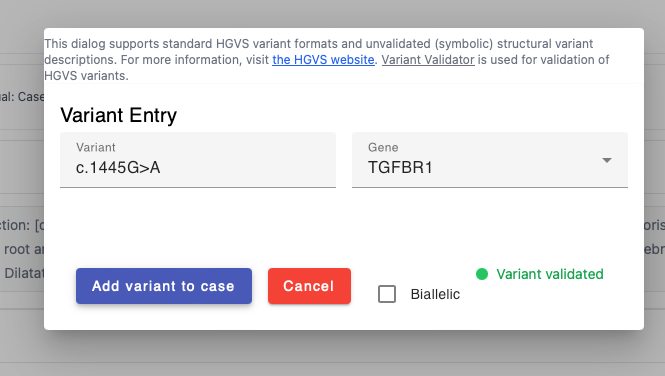
Alleles
You can add HGVS (small variants) or SV (structural variants) using the provided widgets. Make sure the HGVS notation is based on the transcript of reference. If a variant is noted in the publication to be homozygous, click the "biallelic" checkbox.
Submit case
When all of the above information has been added, the case can be added to the cohort with the Submit case button. You will be taken to the cohort editor screen.
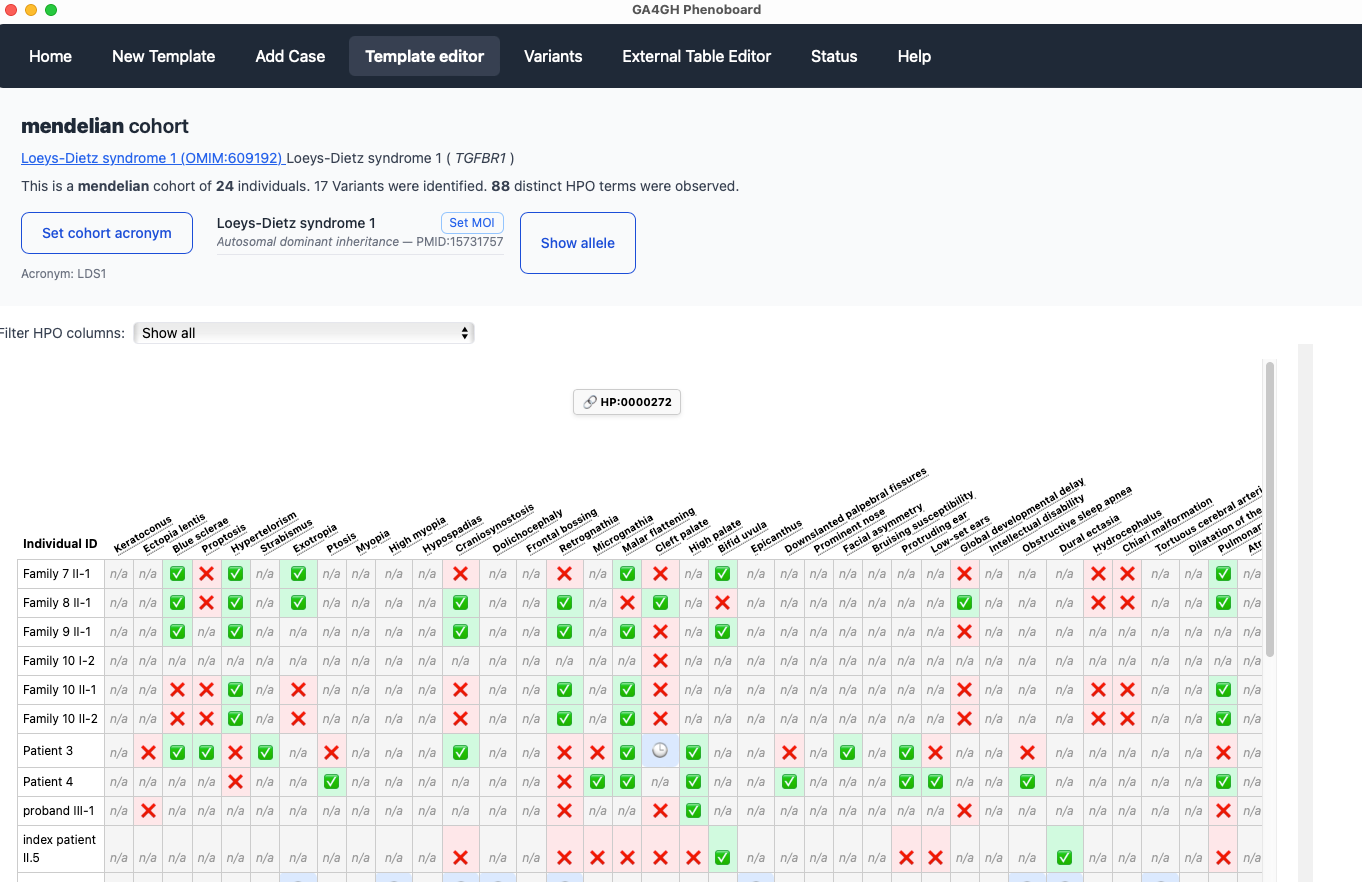
Cohort editor
This screen allows users to visualize and edit the entire cohort.
Final Review & Submission
After you have entered all of the data for each individual, phenoboard offers several functions to validate the curation data and export to file.
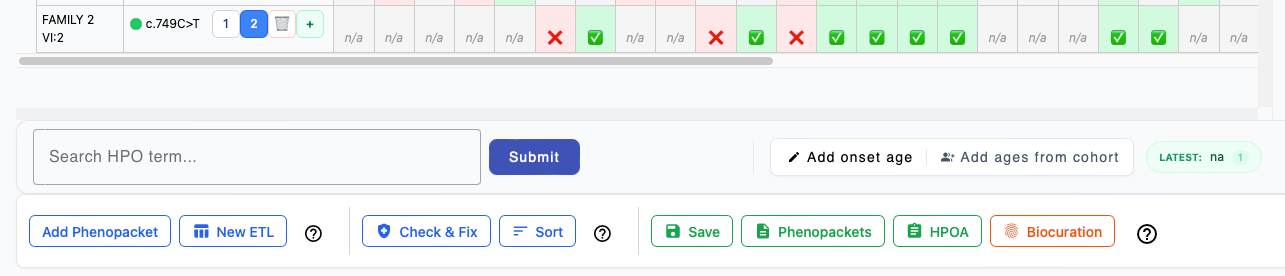
Add Phenopacket
Switch to the New Template tab to enter an additional case report to the current cohort.
New ETL
Switch to the External Table Editor tab to import an additional table of data about individuals to the currrent cohort.
Check and Fix
Validate the current cohort (it is recommended to perform this step before saving the cohort). Some operations can be performed automatically; for instance, if the only warning is that redundant annotations were found, then phenoboard can correct them automatically. For instance, if an individual is annotated with Perimembranous ventricular septal defect HP:0011682, then according to subsumption logic of ontologies, the individual is implicitly annotated to all of the ancestors of the term. Intuitively, it is easy to see that if an individual has Perimembranous ventricular septal defect HP:0011682, then the individual can also be said to have Ventricular septal defect HP:0001629, and it is redundant to annotate the latter term. Phenoboard will automatically remove such redundant annotations if the user confirms the message that appears after clicking Check & Fix.
Sort
If desired, the rows of the cohort can be sorted according to PMID (earliest to latest) using this button.
Saving cohort
To save a cohort, click on the validate button to check for errors. The Sanitize button can automatically correct some kinds of errors. If this does not work, the offending table cell(s) will need to be revised.
Phenopackets
The Phenopackets button exports each row of the table as one phenopacket.
HPOA
The HPOA button exports HPO annotations in aggregated tabular format.
Biocuration
This button adds your ORCID identifier to the cohort export file.
Cohort configuration
Phenoboard uses an acronym for each disease. We prefer the acronyms defined by the Online Mendelian Inheritance in Man resource.
For instance, for Nemaline myopathy 7, autosomal recessive, the acronym is NEM7, and can be found in the title line of each disease entry following the semicolon. In cases in which OMIM does not define an acronym, create an acronym in the same style.
Phenoboard saves the cohort files using a combination of this acronym and the gene symbol. For instance, PAX3_WS3_individuals.json has a gene symbol (PAX3) and an acronym (WS3) for Waardenburg syndrome, type 3.
We also need to specify the mode of inheritance. We recommend consulting OMIM or the Human Phenotype Ontology for this. Rarely, some diseases have two modes of inheritance (autosomal dominant and recessive, for instance), and in these cases, both should be entered. Phenoboard requires that a PMIM be entered to support the assertion of the mode of inheritance. Users can enter an authoratative citation (e.g., the first description of a disease) or a more recent case or cohort report.
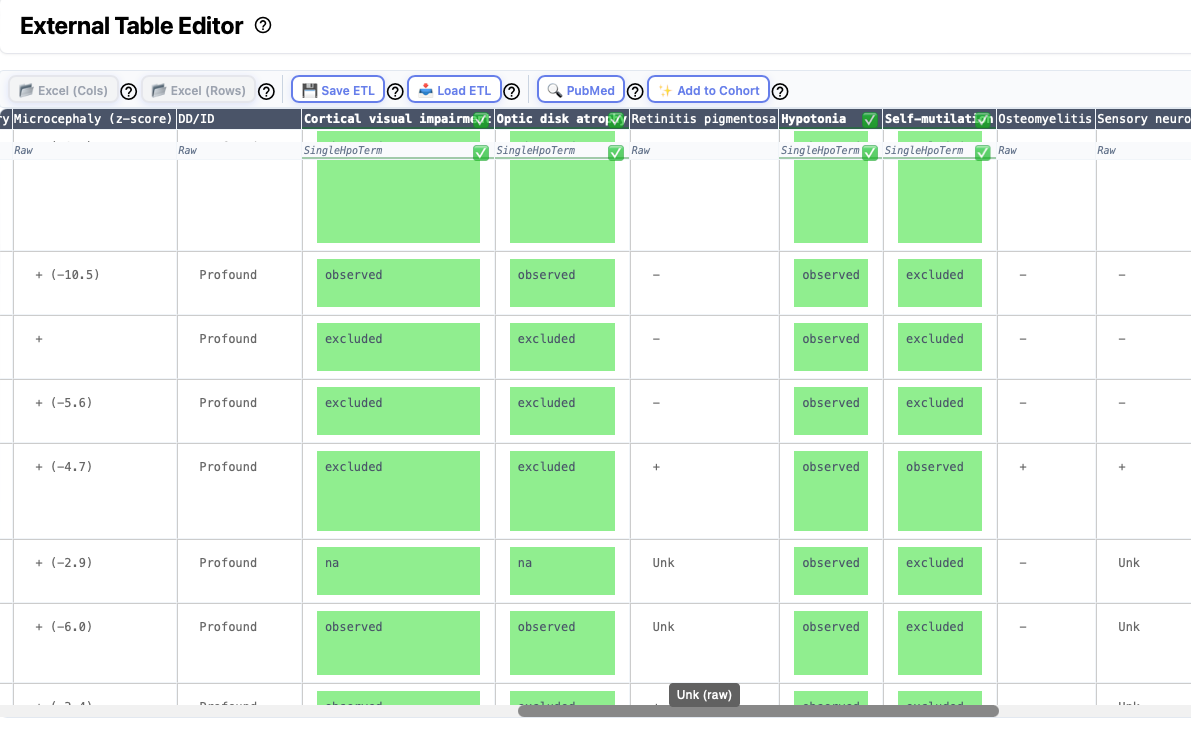
Table editor
Some articles present information about groups (cohorts) of individuals in tables that are either placed within the main article or are provided as a supplemental table. There is no accepted format for such tables, any we have observed a great deal of heterogeneity. However, it can save a lot of time to curate an entire table at once. Phenoboard provides the External Table Editor functionality for these cases. Users need to save the table they would like to transform as an Excel table, and then open it with the Load Excel buttons (one button each is provided for tables with row-based or column-based structure). Note that some external Excel files strew information about a single entity over multiple rows or columns. In this case, users will need to manually edit the files to put all information about a given entity into one cell.
Then, each column is processed by right clicking on the column header or as needed on individual cells.
Excel import
Clinical data about cohorts is often provided in tabular form in the medical genetics literature. Often, supplemental tables with clinical data about the cohort are provided as Excel files. Use the Excel (Cols) button to import Excel files in which data for each individual is represented by a column. Use Excel (Rows) button to import Excel files in which data for each individual is represented by a row.
Warning
Some excel files encountered in the literature can be difficult to parse. For instance, sometimes there are formatting errors such that the contents of one cell "spills over" into the next row. Sometimes, information about two different items is presented in the same cell (e.g., Age and Sex). Phenoboard provides functionality to merge and split cells that may help to deal with this, but it may be easier to manually edit the excel file in some cases.
The Excel import buttons are disactivated if there is no current cohort. Thus, if you are trying to create a cohort from scratch based on an Excel file, you first need to create the cohort data using the New Cohort page.
Saving and Loading ETL files
If you would like to save your work and come back later to finish, use the Save ETL button to save the file that contains the current state of the ETL file. Use the Load ETL button to load the file and resume work where you left off.
ETL: Extract transform load ETL is a three-phase computing process where data is extracted from an input source, transformed (including cleaning), and loaded into an output data container. In our case, we are extracting data from the original Excel file, transforming it into HPO terms and other data required for the phenopacket, and loading the transformed data into the Cohort data structure that phenoboard uses to store data about cohorts of individuals (phenopackets).
PMID
Assign the PubMed identifier of the article from which the cohort data was taken.
Add to cohort
When you are finished transforming each column, the next step is to load the data into the current cohort. This is not possible unless all columns have been transformed or marked as "Ignored" (except for the HPO Text Mining column, which is optional).
Transforming columns
Phenoboard offers a number of different functions for transforming columns, each of which can be started from the context menu that appears upon right click. The following sections describe the major functionalities. Many of the dialogs also provide help that can be accessed by clicking on the ? symbol.
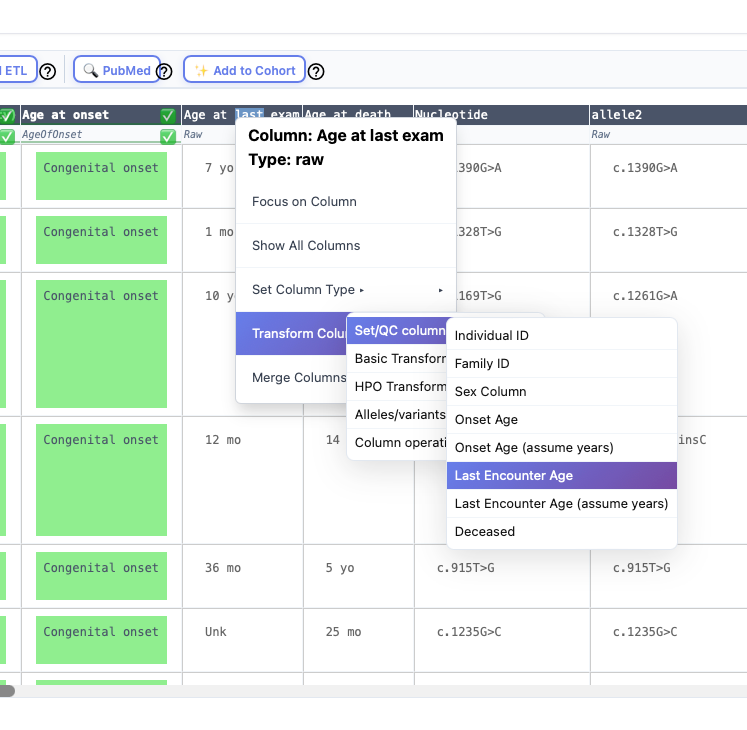
Demographic information
Each individual can be annotated with an individual identifier, sex, age of onset, age at last encounter, deceased status. Optionally, a column with a family identifier can be marked and merged with the individual identifier column. To do this, right click on the column header and navegate the context menu as shown below.
Individual ID
This entry must be unique in the cohort. For instance, it would be an error to have two rows with the identifier "Individual A".
Sex column
This column is used to specify the biological sex of the individual. A variety of formats are transformed into the phenopacket standard entries:
- M: Male
- F: Female
- O: Other
- U: Unknown (or not recorded, not available)
Age of onset/Age at last encounter
Enter the age at first manifestation of any clinical manifestation related to the disease (Onset) and the age at which the individual was last medically examined (last encounter). The ingest will try to transform the data in the column into a Gestational age, HPO term, or ISO 8601 string as appropriate. It is common to see that the age is provide in years (just the number without "y" or "years"). In this case, use the "Assume years" option to ingest the data.
Deceased
The data in this column must be in the phenopacket format
- yes: deceased
- no: alive
- na: unknown/not available
Further information about these fields can be found in the Phenopacket Schema documentation.
Repo Quality Control
Optionally, users can create a repository with one subdirectory for each cohort. For the Phenopacket Store, we have one folder for each gene, and the folder contains one "individuals" file for each disease entity (some genes are associated with more than one Mendelian disease). There is one folder called "phenopackets" into which all of the phenopackets are put.
This page provides quality control for the entire repository. For now, the following items are checked.
- The Mode of inheritance is reflected in the allele count of each phenopacket (e.g., for a recessive disease, we expect two pathogenic alleles).
- Each row in the "individuals" files has been exported to a phenopackets
- There are no other files in the directory
Variant Data
Phenoboard uses the VariantValidator API to validate HGVS expressions and ensure that variant descriptions are syntactically correct and consistent with reference sequences.
See Variants for more information about specific variant classes.
Gene Information
To describe a variant unambiguously, Phenoboard requires the following:
- Gene symbol
- HGNC identifier
- Reference transcript
Providing all three ensures that variants are interpreted consistently across databases, publications, and analysis tools.
HGNC Identifier
The HUGO Gene Nomenclature Committee (HGNC) provides standardized names for human genes.
Each gene has:
- An approved gene symbol (e.g., MED16)
- A unique HGNC identifier (e.g., HGNC:17556)
Using the HGNC identifier avoids ambiguity because gene symbols can occasionally change or be reused in different contexts.
Example:
The gene encoding mediator complex subunit 16 has
Symbol: MED16
HGNC ID: HGNC:17556
You can search for gene information at the HGNC website:
https://www.genenames.org/
Transcript Information
Most human genes produce multiple transcripts (isoforms) due to alternative splicing. As a result, the same genomic variant can have different coordinates and protein consequences depending on the transcript used.
For example, the genomic variant:
- NC_000013.11:g.32363225A>G
occurs in the BRCA2 gene but maps differently across transcripts:
- NM_000059.4:c.8023A>G → NP_000050.3:p.(Ile2675Val)
- NM_001406719.1:c.7927A>G → NP_001393648.1:p.(Ile2643Val)
- NM_001406722.1:c.1606A>G → NP_001393651.1:p.(Ile536Val)
One transcript is non-coding:
- NR_176251.1:n.8222A>G
This example illustrates an important principle:
!!! important "Why transcripts matter" A variant does not have a single consequence — its interpretation depends on the reference transcript.
Because of this, publications and clinical reports must always specify both:
- The variant description
- The transcript accession (e.g., NM_000059.4)
Older literature sometimes omits transcript information. In such cases, determining the correct transcript may require careful investigation and is sometimes impossible. When uncertainty remains, we recommend contacting the authors or excluding the publication from curation.
MANE Select Transcripts
A MANE Select transcript is a standardized reference transcript chosen to promote consistent variant reporting.
MANE (Matched Annotation from NCBI and EMBL-EBI) transcripts have:
- Identical exon structure between RefSeq and Ensembl/GENCODE
- High biological and clinical relevance
- Broad community acceptance
There is typically one MANE Select transcript per protein-coding gene.
!!! tip "Recommendation" We strongly recommend using the RefSeq MANE Select transcript whenever available.
The Human Phenotype Ontology (HPO) project also curates variants using RefSeq MANE transcripts (for example: NM_130837.3).
Entering Data in Phenoboard
Phenoboard provides tools to simplify data entry.
Automatic retrieval
Use the Fetch HGNC/Transcript Info button to automatically retrieve:
- HGNC identifier
- RefSeq MANE Select transcript
from the HGNC database.
Manual lookup
Alternatively, you can search manually:
HGNC website: https://www.genenames.org/
Summary
To ensure accurate variant interpretation:
- Always provide the gene symbol
- Always include the HGNC identifier
- Always specify the reference transcript
- Prefer the MANE Select transcript when available
Variants
Phenoboard can be used to code and Q/C three kinds of variant.
1. HGVS
This class of variant refers to any variant that can be coded using transcript-based HGVS nomenclature (from the Human Genome Variation Society (HGVS)). In practice, these are relatively small (usually less than 25 nucleotides) changes that are located within the transcript sequence of a gene.
Phenoboard operates on a cohort-basis in which one transcript of reference is used for the entire cohort. For instance, if we wanted to code this variant: NM_000138.5(FBN1):c.8057G>T (p.Cys2686Phe), then the transcript (NM_000138.5), would be available for the entire cohort and we would enter
c.8057G>T (only). Variants in non-coding transcripts, such as NR_003137.3(RNU4-2):n.69C>T can be entered using the "n." notation (in this example we would enter n.69C>T]).
Symbolic structural variants
Data about large structural variants is often provided in an imprecise fashion in the literature, e.g., "DEL ex3-5". Phenoboard supports this. Users should provide the category of structural variant (DEL, DUP, INS, INV, TRANSLOCATION) if possible or otherwise indicate simply "SV".
Intergenic variants
Promoter and enhancer variants outside of the transcript of a gene cannot be represented using transcript-based HGVS notation. Instead, the accession number of the chromosome (in HG38) and the corresponding genomic HGVS nomenclature should be provided.
For instance, NC_000019.10:g.12887294G>A is a promoter variant upstream of the KLF1 gene.
Structural variants
Structural variants (SVs) represent genomic variations that involve breakage and rejoining of DNA segments. SVs can alter normal gene dosage, lead to rearrangements of genes and regulatory elements within a topologically associated domain, and potentially contribute to physical traits, genomic disorders, or complex traits.

Nomenclature
For most of the history of human genetics, it has been difficult to determine the precise boundaries and architecture of SVs because of technical limitations. In contrast to small variants that can be easily captured with HGVS nomenclature, SVs are often refered to using natural-language descriptions in the medical literature (e.g., "Deletion of exon 5"). This is changing with the increasingly important role of long-read genome sequencing (LRS) and new LRS technologies, but because so much of the literature has what we call "symbolic" SV notation, this is currently what phenoboard supports.
Developers
GA4GH Phenoboard is a tauri application with a Rust backend and an Angular front end. It is designed to curate cohorts of individuals diagnosed with genetic disease using Human Phenotype Ontology{:target="_blank"} and Global Alliance for Genomics and Health{:target="_blank"} Phenopacket Schema{:target="_blank"}.
The application makes major use of the following rust crates.
- ontololius{:target="_blank"}
- ga4ghphetools{:target="_blank"}
- fenominal{:target="_blank"}
This page summarizes some of the angular and Rust/tauri commands that have been useful to create the application.
Running in development mode
Most users should use the provided installation programs. Developers can start the program in development mode as follows
npm run tauri dev
Creating installation program
To generate an installation program (for the current OS), run the following
npm run tauri build
This will create an installer in the following location
src-tauri/target/release/bundle/dmg/phenoboard_0.3.1_aarch64.dmg
This can be attached to a release. Double-clicking the file will open a typical MacIntosh installation window.
Port issues
If one gets the error message: Port 1420 is already in use, then use the following command to obtain the process ID:
lsof -i :1420
COMMAND   PID  USER   FD   TYPE             DEVICE SIZE/OFF NODE NAME
node    32315 <user>   49u  IPv4 0xd9cc1bb0104a525f      0t0  TCP localhost:timbuktu-srv4 (LISTEN)
then end the process with
kill -9 <PID>
This may also cause the typescript part of the app to not be updated when we run npm run tauri dev.
Run in browser
Can be useful with the DevTools panel
npm run start
Documentation
We create documentation using the mdbook package. A local server can be started as follows.
cd book
mdbook serve --open
Angular tips
Some useful tips for working with angular.
Reset cache
Sometimes Stale build artifacts or module cache may lead to errors. We can clean the cache as follows.
# Clean Angular/Nx cache
npx nx reset
# Clean node_modules and dist
rm -rf node_modules dist .angular .output .vite
# Clear package manager cache (optional but helpful)
npm cache clean --force
# Reinstall
npm install
Incompatibilities
Avoid BrowserAnimationsModule in standalone components. Importing it seems to lead to the error
NG05100: Providers from the BrowserModule have already been loaded.
Linting
The Angular team maintains an official schematic that configures ESLint for you automatically. Run this command at the root of the project (angular 22):
npm install --save-dev eslint @angular-eslint/eslint-plugin @angular-eslint/eslint-plugin-template prettier eslint-config-prettier eslint-plugin-prettier typescript-eslint
npm install --save-dev eslint @typescript-eslint/parser @typescript-eslint/eslint-plugin eslint-plugin-import eslint-plugin-jsdoc eslint-plugin-prefer-arrow
npm install --save-dev @angular-eslint/template-parser @angular-eslint/eslint-plugin-template
npm install --save-dev eslint @eslint/js typescript-eslint angular-eslint@20.0.0 --legacy-peer-deps
Then add an .eslintrc.json file
Linting can now be performed with the followinh commands
npx eslint src/app/my-component/*.ts
npx eslint src/app/my-component/*.html
Linting SCSS files
Install styleLint
npm install --save-dev stylelint stylelint-config-standard-scss stylelint-config-prettier-scss
Add the .stylelintrc.json at the top level
Add the following to the package.json file
"lint:styles": "stylelint \"src/**/*.scss\"",
"lint:styles-fix": "stylelint \"src/**/*.scss\" --fix",
Run the style linter
npx stylelint src/app/app.component.scss
To fix
npx prettier --write src/app/your-component.component.scss
Pretty formatting
Create the two files .prettierignore and .prettierrc, and add commands for lint and pretty to the project.json. Then run
npx prettier --check src/app/app.component.ts # check one file
npx prettier --write src/app/app.component.ts # fix one file
npm run format:check # check entire repo
Polishing CSS
One challenge in improving the look and feel of an angular app is that one needs to run the app, add data, and then click through the to component to be worked on. Instead of this, we can use mock data (does not need to be kept around in git!), and then have the app start with only the specific componen
Here is a component that provides mock data
import { MinedCell } from "../models/hpo_mapping_result";


export const MOCK_CELL: MinedCell = {
  cellText: "Patient presents with severe macrocephaly, intellectual disability, and occasional seizures.",
  rowIndexList: [1],
  mappedTermList: [
    {
      hpoId: 'HP:0000256',
      hpoLabel: 'Macrocephaly',
      status: 'observed' as any,
      onset: 'congenital'
    },
    {
      hpoId: 'HP:0001249',
      hpoLabel: 'Intellectual disability',
      status: 'observed' as any,
      onset: 'early childhood'
    }
  ]
};

export const MOCK_SHELF = [
  { id: 'HP:0001250', label: 'Seizures' },
  { id: 'HP:0000707', label: 'Abnormality of the nervous system' },
  { id: 'HP:0001263', label: 'Global developmental delay' },
  { id: 'HP:0002123', label: 'Generalized myoclonic seizures' },
  { id: 'HP:0004322', label: 'Short stature' },
  { id: 'HP:0001252', label: 'Hypotonia' },
  // A very long term to test CSS wrapping
  { id: 'HP:0001297', label: 'Abnormality of lateral ventricle morphology' }
];
We temporarily alter the component
export class MinedCellEditorComponent {
  //cell = input.required<MinedCell>();
  //toExclude = input.required<{id: string, label: string}[]>();
  cell = input<MinedCell>(MOCK_CELL);
  toExclude = input<{id: string, label: string}[]>(MOCK_SHELF);
And temporarily alter the AppComponent:
@Component({
  selector: 'app-root',
  standalone: true,
  //templateUrl: './app.component.html',
  template: `
    <div style="padding: 50px;">
      <app-mined-cell-editor />
    </div>
  `,
  styleUrls: ['./app.component.css', '../styles.scss'],
  imports: [
    NavbarComponent,
    RouterOutlet,
    FooterComponent,
    MinedCellEditorComponent
]
})
export class AppComponent {}
Following this, we run from the base source directory:
npm start
Then we open the system browser to view the page (http://localhost:1420/home). If we change the CSS/SCSS file of the component, we should immediately see the effect. After we are finished, we can delete the mock data and revert the changes to the input of the component and to the main app.
Debugging if CSS classes are not being included in production builds.
Check if the class itself is included in the production
grep 'form-input' dist/phenoboard/browser/styles-OPWQKR5O.css
Then build the app locally
npm run build
Then start the app locally in a broweser
npx serve dist/phenoboard/browser
Here we can use dev tools to see if the class is being used correctly.
Practical tips
Clearing the Mac cache
Sometimes the spotlight search function will include links to local versions of the phenoboard app when we want to test a version that was downloaded from the Releases page.
In this case,
- open the Activity Monitor (Applications → Utilities → Activity Monitor).
- find phenoboard, select it, and click the “i” (info) button in the toolbar.
- Go to the “Open Files and Ports” tab.
- This will reveal the path of the executable that spotlight is finding.
- Enter
open -R <path from above>/Phenoboard.appto open the folder in which this extecutable is located - Delete the executable file
Development on a linux system
Prerequisites:
- pkg-config
- libgtk-3-dev
- libjavascriptcoregtk-4.1-dev
- libwebkit2gtk-4.1-dev
On debian-like systems, these libraries can be installed with sudo apt install. After this, follow the instructions in overview.
Release
This page explains the release process whereby installers are added to a Release on the project GitHub page.
Following an important update, increment the Application version (we are using the same version number in Cargo.toml and package.json and tauri.conf.json).
The version number will be something like 0.5.12.
The npm version patch script will increment patch version in Cargo.toml and package.json and create the tag. You will see the new
tag version on the shell. Use this (adjust v.0.5.???) to push to origin. This will trigger a new release.
git add .
git commit -m "<whatever>"
npm version patch
git push origin <tag>
(e.g., git push origin v0.5.129)
If all goes well, this will add a new release with Mac, Windows, and Debian/Ubuntu installers.
Git tags
Here are some tips for dealing with the tags.
- Update the local tags
git fetch --prune --prune-tags origin
- Show the available tags
git tag
- Show latest tag
git describe --tags --abbrev=0
Note that we have run the following command
npm config set tag-version-prefix v
Manual release
To create an installer locally (for the current OS), enter the following command
npm run tauri build
This will create an installer under src-tauri/target/release/bundle/.
Signing the apple installer
We need to sign the Apple installer (DMG) to avoid users being confronted with difficult to understand error messages when they try to install the app. Here is the general procedure.
We first create the dmg file
export APPLE_SIGNING_IDENTITY="<secret>"
export APPLE_API_KEY_PATH="<secret>.p8"
export APPLE_API_KEY_ID="<secret>"
export APPLE_API_ISSUER="<secret>"
# Run the build (Tauri will sign every inner binary and package it cleanly)
npm run tauri build
Assuming the version of the app is v0.5.148, this will create an installer and a dialog will pop up with which you can install the app locally (you can close this with no action). It will also create a file at
phenoboard/src-tauri/target/release/bundle/dmg/phenoboard_0.5.148_aarch64.dmg
Following this, the following commands will interact with the Apple server to sign the code and prepare it for release
#!/bin/bash
DMG_PATH="..../phenoboard/src-tauri/target/release/bundle/dmg/phenoboard_0.1.1_aarch64.dmg"
KEY_PATH="/<secret>.p8"

echo "Signing DMG..."
codesign --force --options runtime --timestamp --verbose --sign "Developer ID Application: Peter Robinson (GVFTJU76J6)" "$DMG_PATH"

echo "Submitting to Apple..."
xcrun notarytool submit "$DMG_PATH" --key "$KEY_PATH" --key-id "<secret>" --issuer "<secret>" --wait

echo "Stapling ticket..."
xcrun stapler staple "$DMG_PATH"

echo "Done! Ready for upload to GitHub release."
Finally, replace the DMG file from the new phenoboard release. The other installation files should work out of the box (Windows systems show a warning, but are not nearly as difficult to manage as with Apple).